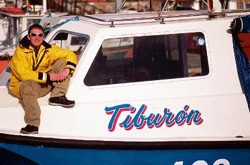
Jim O’Donnell, skipper of top Plymouth charter boat ‘Tiberon’, explains how to use a chart plotter to drift over marks with precision.
BASICALLY there are two types of boat fishing, fishing done with the boat on the move, and fishing done whilst the boat is stationary.
Unfortunately, most fishing marks lack lovely great buoys which you can tie up to, so our only way to fish them with the boat static is to chuck the hook.
Fishing using this method can be very successful for all the bottom feeding species in UK waters like conger, ling, rays, cod, skate and when the weather unexpectedly takes a turn for the worse, your only opportunity may be to drop anchor and ride out the storm in some comfort.
Here I hope to show you how to use your plotter, so that when you chuck the hook, you will know with confidence the mark you intend to fish is directly beneath the boat. For the purpose of this exercise we will imagine we are going to anchor a wreck and fish for conger eels and ling.
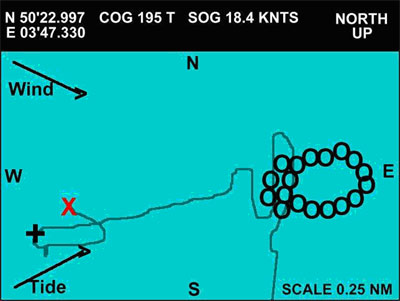
Key to graphics
+ = Cursor
O = Event/Mark icon
X = Vessel![]() = Vessels track over the sea bed
= Vessels track over the sea bed
 |
Step 1
First choose the mark you would like to fish, but take into account the conditions as smaller wrecks will be very hard to hit, if it’s a bit choppy. Steam to the mark and when you get there, turn the fish finder on and select the 200KHz frequency beam, which is used for pinpointing exactly what is beneath the boat as you pass over it. Circle over the wreck using the sounder to check the tide side, as this is the one you are about to anchor. Check that there are no obstructions that you never plotted out before and that your original marks are correct, as you don’t want to be dropping expensive amounts of tackle right into the depths of hell itself. Now it’s decision making time. Where will you chuck the anchor? Things to take into consideration will be wind, tide and the depth of water you are in. ‘Wind with tide’ situations are the easiest to anchor, and the distance away from the wreck the anchor needs to be will depend on the depth of water. In Plymouth we need to be about one tenth of a mile uptide of the wreck to anchor successfully. Arm the unit’s cursor and place it in the position you think feels right {this will usually be somewhere between the angle of the wind and the angle of the tide} and then move slowly towards this position, checking the ground around where the anchor will dig in using the fish finder as you go, so that you are not dropping it into something that it will snag into. If all’s clear, proceed to drop the anchor and let your self back to the position.
 |
Step 2
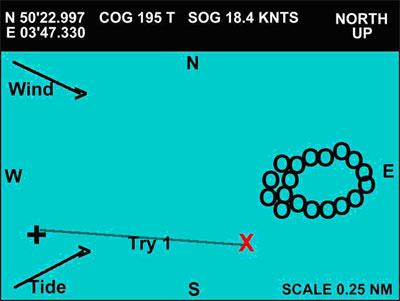
Whoops we’ve missed, but not to worry as our first attempt has left us with an accurate template for which we can use for our second and final attempt. The line from the cursor to the vessel will be the exact angle we will end with on our next attempt.
 |
Step 3
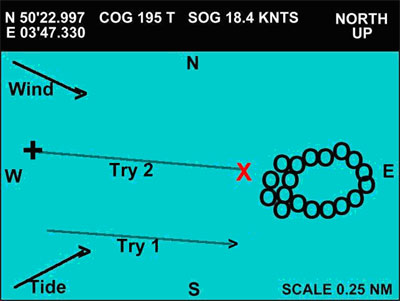
We now know the angle of attempt one will be the angle that the boat will finally lie when we go for our second and final attempt. I say final because unless conditions are poor there should be no excuse for missing the mark a second time. Take the angle from attempt one and using an imaginary process, use it to work out where to place the cursor for attempt two {a ruler or piece of transparent plastic can be used to transfer the line to the position required}. Keeping the line parallel to that of attempt one, move it until one end is level with the part of the wreck you wish to hit. Place the cursor on the other end and repeat step one again by checking the ground, dropping the anchor and then letting the tide take you back into position. Hey presto, there you have it! It took two attempts but on the second attempt we hit the wreck with pinpoint accuracy.
Tip time! If you anchor a lot in relatively deep water where the tide runs hard, try using leaded crab pot rope. It’s a little more expensive but is strong and has a lower diameter, thus giving you the same effect as braid on a fishing rod. You can fish harsher conditions without struggling.
Debrief
Well there you have it. If you have read all four of my chart plotter articles in this site, you now know what to look for when choosing a chart plotter, how to plot bottom features accurately and how to use your plotter to fish both at anchor and on the drift. As with most things, it won’t be easy at first, but the more you get out there and do it, the more successful you will become at it. Good plotting!
Jim O’Donnell, ‘Tiberon’, Plymouth, Tel 07855 040015; Email: skipperjim@blueyonder.co.uk
![]()


